Quick start
Follow the steps below to get started:
Clone the repository
Open a terminal and run:
git clone https://github.com/sollynoay/ACSim.git
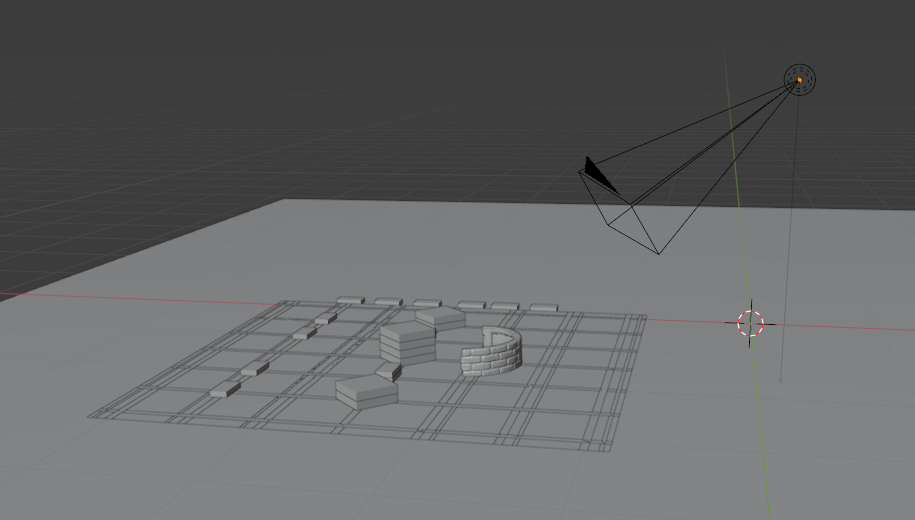
Open the Blender file
Launch Blender, and open the test.blend file located in the cloned folder. Please use test.blend file first.
Install the Sonar Ray Tracer add-on
Go to Edit > Preferences > Add-ons
Click Install…
Select the file sonarRT.zip
Enable the checkbox for Render: Sonar Ray Tracer
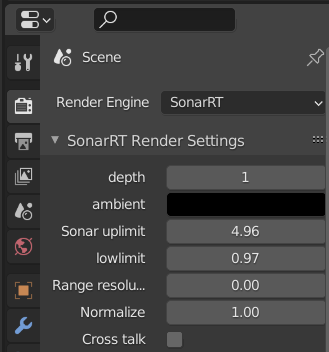
Check the Render Engine
In the Render Properties tab, look for SonarRT in the Render Engine dropdown.
If you see “SonarRT” listed, the setup was successful.
Press F12 to render and check the sonar image output.
You can change the targets, or change the camera pose (make sure the light source is at the same position with the camera).
Note
If any problem occurs during execution, go to Window > Toggle System Console in Blender to view the error log and debug output.
Parameters
depth
This parameter controls the maximum depth of ray recursion.
If set to 0, only the first surface hit is considered — no multi-path reflection will be computed.
Increasing the value allows rays to continue bouncing off surfaces recursively, enabling simulation of multi-path effects.
sonar_uplimit
The maximum range (in meters) for sonar detection. Rays beyond this distance will be ignored.
sonar_lowlimit
The minimum range (in meters) for sonar detection. Rays closer than this threshold will be excluded from the output.
normalize
This normalizes image intensity before output.
Generate with Script
Instead of rendering manually, you can also control the simulation using a Python script in Blender.
Go to the Scripting tab in Blender.
Open the run.py script.
Run the script to simulate and save the sonar result.
Here is an example script:
# Import libraries
import os
import bpy

cam = bpy.data.objects['Camera']
bpy.context.scene.camera = bpy.context.scene.objects["Camera"]
scene = bpy.context.scene

# Set camera position
cam.location.x = xxx
cam.location.y = xxx
cam.location.z = xxx

cam.rotation_euler[0] = xxx
cam.rotation_euler[1] = xxx
cam.rotation_euler[2] = xxx

# Light should follow camera position
light = bpy.data.objects['Light']
light.location.x = cam.location.x
light.location.y = cam.location.y
light.location.z = cam.location.z

# Parameters can be directly changed in this way
scene.sonarRT.res = 0.003
scene.sonarRT.save_path = "xxx.npy"

# Render
bpy.ops.render.render()
Note
This demo avoids the installation of any additional Python packages. It is using Blender built-in ray-mesh intersection function, so the rendering speed can be slow.
If you need advanced features such as accerleration and the rolling shutter effect, please refer to the other tutorial on installing external packages into Blender’s Python environment.